28 October 2016

A Little Happy Sew Along ~ Merry Christmas Mini Quilt ~ Part 5 Finishing Touches


Welcome back for the final installment of the 'a little happy Sew Along'.  I hope that you had fun last week making your felt Christmas stockings!

This week we'll be completing the Merry Christmas Mini Quilt adding all the little finishing touches that make it truly special.

SCRUMMY SUPPLIES REQUIRED THIS WEEK

A piece of wadding/batting and a piece of backing fabric aprox 10 1/2" x 11 1/4", just make sure that they are both a little larger than your mini quilt top.

Quilting pins or Basting spray

5 buttons

Binding fabric, for mini's I use a slight narrower binding strip than I do for full size quilts, so for my Merry Christmas Mini Quilt, I cut one strip at  2 1/4" by full width of fabric or if you prefer for those of you who purchased kits you can use the strip enclosed (my normal quilting width binding) which was 2 1/2" x full width of fabric

12wt threads for hand quilting

Lets get stitching.........

First off you will need to make a quilt sandwich, this is basically where you will layer up the backing fabric, wadding and your mini quilt top.  I have written a full step by step 'a little happy tutorial' for how to do this HERE.  What I would add in is for all small projects (and I must confess on occasion for some larger quilts....oh the shame), I always use 505 Basting Spray rather than pins.  If you haven't used it before 505 is a temporary adhesive and it really does make layering a doddle.  I find it works best to spray the wadding rather than the fabric and a word of warning don't use to much, less is definitely more on this occasion and take care where you spray otherwise all your surrounding surfaces will be very tacky...believe me on this!! Don't panic if you place your batting in the wrong position, you can simply lift it, give it another spritz and re position.  Sorry we do not post 505 Spray, but we have it available in our Ruskington shop.

Once you've made your quilt sandwich, you're ready to start quilting.  I chose to hand quilt mine, but please feel free to quilt as you desire.

If you decide to hand quilt, here's a close up of what quilting I added........


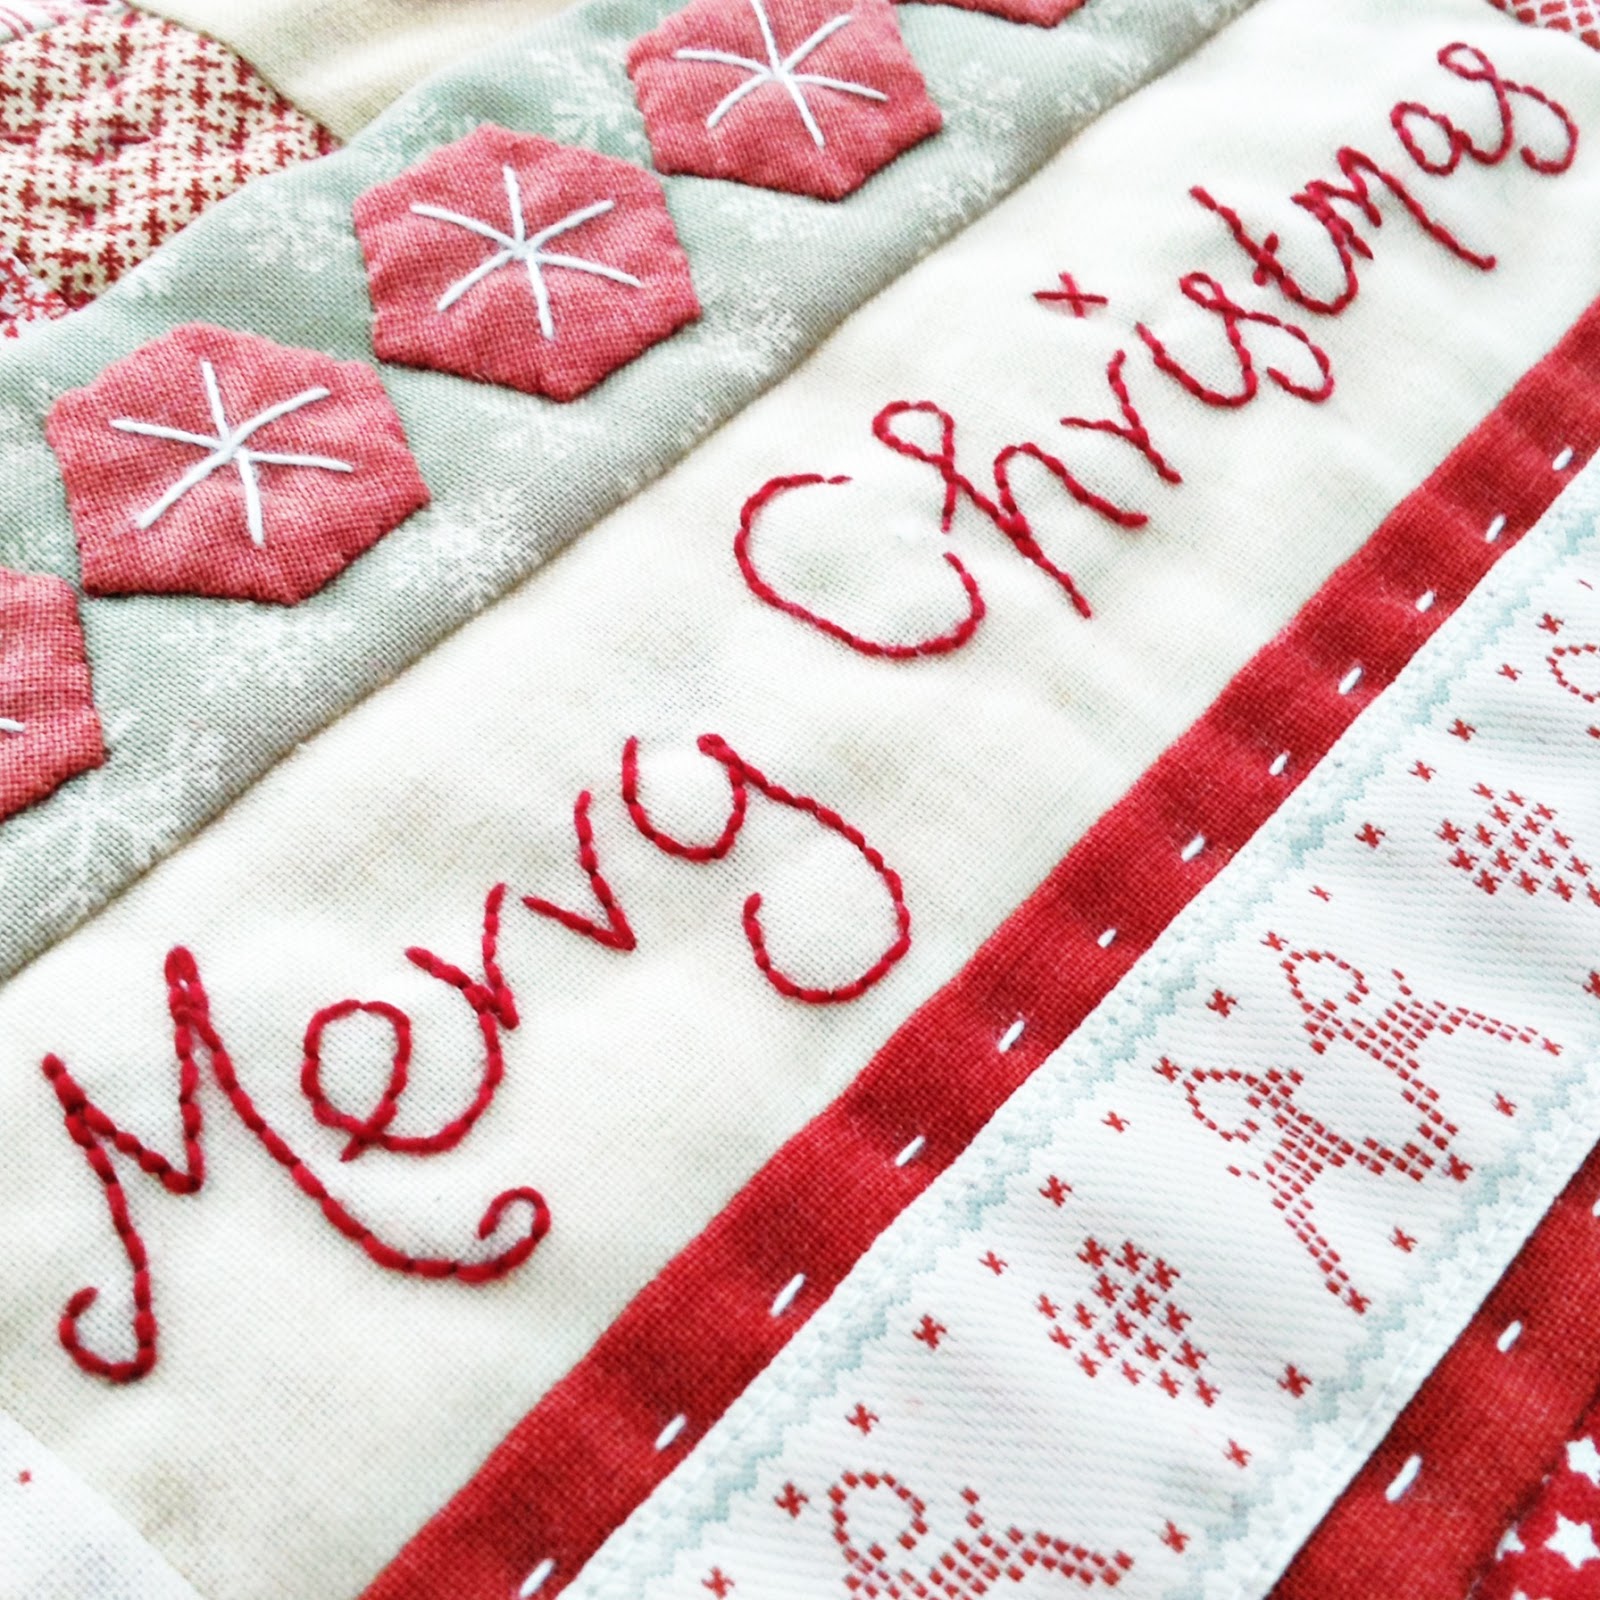
1.  As you can see from the picture I originally quilted around the tree in off white (Aurifil 12wt #2021) but it didn't really stand out enough for me, so I had a change of plan and used red (Aurifil 12wt #2260), which you can see in pictures further down in a moment.

2. I quilted at a diagonal through all the squares on the 9 patch using red.  I used my Hera marker and quilting ruler to mark the straight lines which I then stitched on top of.  (The Hera marker creates a crease in the fabric.)

3. I quilted either side of the ribbon in off white, again I marked the straight line first with my Hera marker

4. As before I used my Hera marker to draw a diagonal line through each square and the stitched in a zig zag from one side to the other and back again.

If you've never hand quilted before, this is an ideal project to have a go, so I thought I would talk you through what I like to do.   I use a Merchant and Mills straw needle as they have a good size eye and I have no problem threading the 12 wt thread.  

I start by making a knot in my thread.....  A little happy tip..... my nan always told me that your piece of thread should be no longer than from your finger tips to your elbow..... I then bring my needle in from the back of my quilt to where I wish to start quilting, give it a little tug, so that the knot pulls through the backing fabric and beds itself into the wadding, without coming through to the quilt front.

I like the look of small stitches with a slightly larger gap in between, and tend to bring 2 or 3 stitches on to my needle at a time.  I think this is one of those things where you naturally find your own rhythm and stitch length and it's best to not over think it, just go with the flow.  I also recently discovered a new ergonomic style of thimble by Prym available HERE which I have found brilliant and it is saving my poor middle finger which previously was stabbed on a very regular basis!


When I've finished stitching, I do a couple of small stitches to secure my thread and then I take my needle back in to the wadding coming out a couple of inches away from where I finished stitching.  I then pull the thread taught before cutting it off.  The end of the thread then buries itself into the wadding and out of sight. I hope that you feel inspired to give hand quilting a go!

Once you have added your quilting trim away the excess backing fabric and wadding.  Then add the buttons, one to the top of the Christmas Tree and one at the centre of each square at the bottom of the hanger. (Can you see how much better the red thread looked than the white for the quilting!)


Next sew your quilt binding, I like to machine mine to the front of the quilt and hand stitch to the back.  For a full step by step 'a little happy tutorial', take a look HERE.

The final step is to tie your Felt Christmas stockings to the star buttons, hang up, stand back and admire.........you are done!


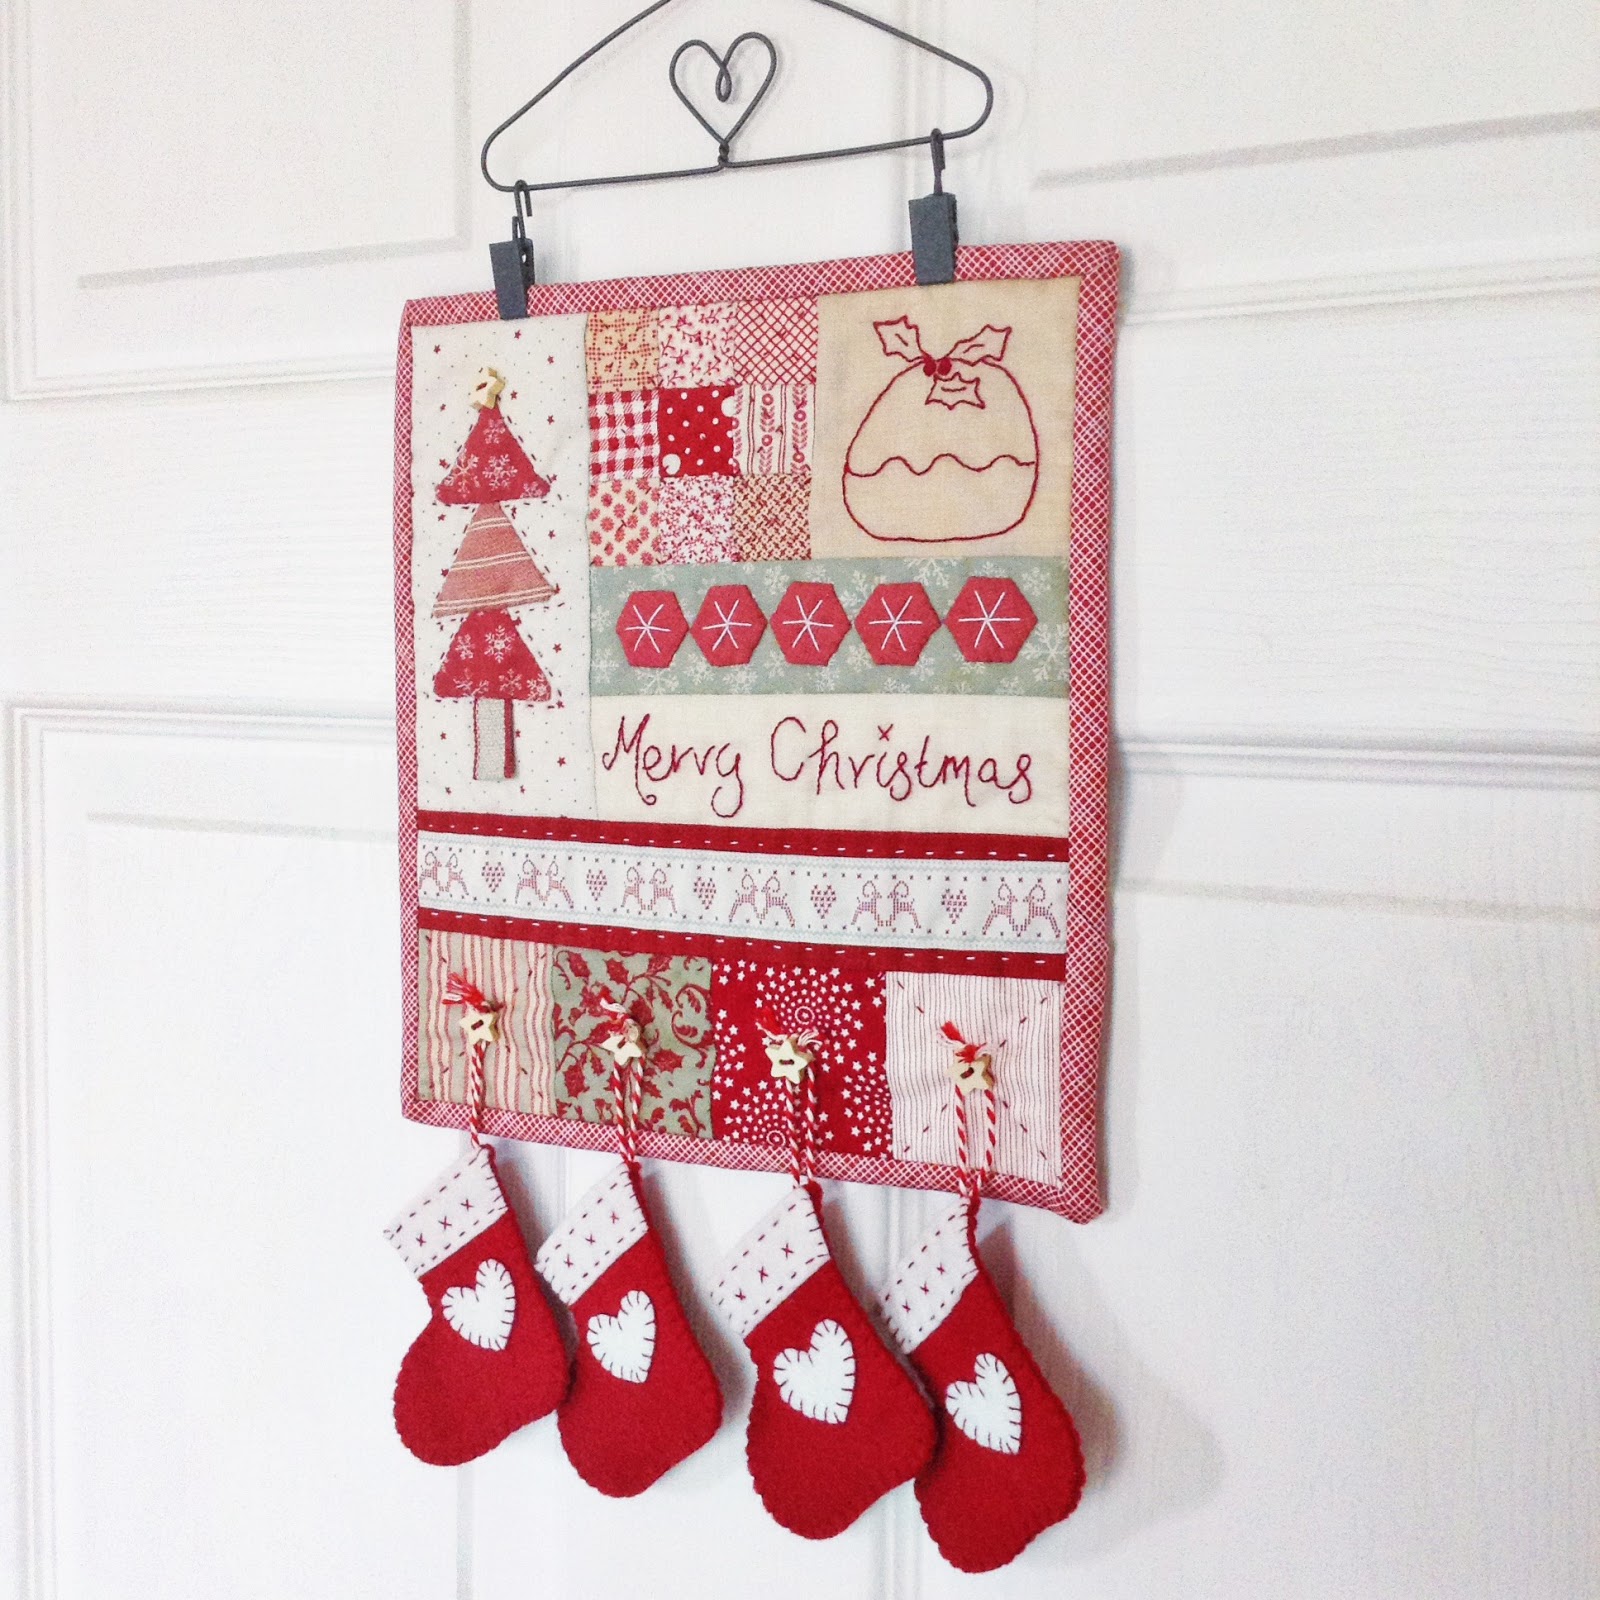
I hope that you enjoyed stitching your Merry Christmas Mini Quilt and it will bring a touch of homemade happiness and cheer to your home this year and for many years to come!

I have lots more Sew Alongs and Patterns which I will be sharing with you over the next few months, so I hope that you will visit again soon.  Don't forget to add me to your Blog list so you do not miss out!!  

Thanks for sewing along! 
Share:

21 October 2016

A Little Happy Sew Along ~ Merry Christmas Mini Quilt ~ Part 4 Felt Stockings


Doesn't time fly when you're having fun..... can you believe it's week 4 of the 'a little happy Sew Along' !  Its been brilliant seeing all your Merry Christmas Mini Quilts coming together, thank you for sewing along!

This week we're going to be making the little felt stockings.  Felt is a medium that I love to work with and over the years I have sewn with many different types of felt including acrylic, wool mixed with synthetic fibres, 100% wool and after many trials and tribulations, my felt of choice is a wool/rayon mix by National Nonwovens.  Not only do I love the consistency of thickness and texture, I was completely blown over by the colours available.  Forget the brash primary coloured thin felt you use to use when you were at school...this felt is for grown ups!   


SCRUMMY SUPPLIES REQUIRED THIS WEEK

You will need to grab two colours of felt from your stash, some bakers twine and co-ordinating thread. I used Aurifil 12wt in #2260.

Just like last week you will need to print off the pattern, which you can download HERE.

CUTTING INSTRUCTIONS

From the Red Felt cut (8) stocking shapes* 
From the White Felt cut (4) cuffs and (4) hearts
From the Bakers Twine cut (4) x 9" pieces`

*A little happy tip or two....... I like to fold my felt in half and cut both the front and back pieces for each stocking at the same time, that way I get perfectly matching stockings.  I also like to make the required number of templates (I made 4 stocking templates), that way I can then lay them out making the best use of my felt.......felt is great as even the smallest scrap can come in useful!  Sharp scissors are essential, I find my 5" Fiskers Needlework scissors, brilliant for this.  For my other favourite notions, take a peek HERE.


LETS GET SEWING!

For each stocking, you need two stocking shapes, a cuff, a heart and a piece of bakers twine.

First off you will need to attach the bakers twine to the stocking.  To do this, fold your piece of bakers twine in half and using tiny little stitches, sew over the bakers twine at the centre point to the top right wrong side corner of what effectively will become the back piece of your stocking (take a peek at the picture below!).  Make sure all your knots are on the inside of the stocking i.e. the same side as the bakers twine!  Leave the ends of the bakers twine as is, next week we'll be attaching the stockings to the mini quilt.


We're now going to decorate the front of the stocking, I know this sounds like a silly thing to say, but make sure you decorate the right side, it's easy to get in a muddle when working with felt as there is no obvious right or wrong side!

Position your cuff at the top of the pocket and sew in place.  I did little running stitches at the top and bottom and added some cross stitches in the middle.


Position and sew the heart in place, I used blanket stitch for mine.  You may find this 'a little happy tutorial' useful if you've never sewn blanket stitch before.


Finally place the back and front stocking pieces wrong sides together and using blanket stitch again sew around the edge, leaving the top edge open.  Perfect for adding some sweet little treats!

Repeat for the remaining three stockings.

I hope that you'll join me next week for the final installment when we'll be putting the finishing touches to your mini quilt.  

Don't forget to the use the following hastags: 

#alittlehappysewalong or/and #prettyfabricsandtrims

Happy Stitches!

PS.... here's a sneaky peek of the next 'a little happy sew along' which I'm planning towards the end of January....think woven wool, linen, lawn and pretty trims!


Share:

14 October 2016

A Little Happy Sew Along ~ Merry Christmas Mini Quilt ~ Part 3 Embroidery


Welcome to week 3 of the Merry Christmas Mini Quilt sew along, I hope that you've all enjoyed the applique from last week.

This week is embroidery week.  As you know I love hand embroidery, so the Mini Quilt did of course have to incorporate some in to the design.   I've kept things simple though and stuck to a traditional redwork design and also used just two stitches, Back Stitch in the main and Satin Stitch for the berries on the holly.  

Here's some close ups for you......


I used 12 wt Aurifil #2260 for my embroidery and a Merchant and Mills Straw Needle.  I did not hoop up the mini quilt, I simply held the fabric and stitched.

Both embroidery patterns can be downloaded HERE.

If your new to embroidery, you may find these 'a little happy tutorials' useful:

For how to transfer the embroidery pattern, take a look HERE and for how to stitch Back Stitch, take a look HERE.

Next week we'll be making the little felt stockings, so I hope that you'll join me then and don't forget Mum (Penny) and I would love to see your progress, so please do use the hashtags, so we can take a peek! 

#alittlehappysewalong or/and #prettyfabricsandtrims

Happy Stitches!
Share:

7 October 2016

A Little Happy Sew Along ~ Merry Christmas Mini Quilt ~ Part 2 Applique and Hexies


Welcome to Week 2 of the Merry Christmas Mini Quilt Sew Along!  It's been so lovely seeing all your mini quilts in progress!  This week we're going to cover the Christmas tree applique and the sweet little hexies.

BEFORE STARTING Always Remember to:

1. Read all instructions before you begin.
2. RST means right sides together.
3. All seam allowances are  1/4”.
4. WOF means width of fabric.
5. If you need help, please do get in touch!

SCRUMMY SUPPLIES REQUIRED THIS WEEK


H - (1) 2 1/2" x 5 1/2" rectangle (cut last week)
I - (1) 2 1/2" x 3" rectangle (cut last week)
J - (1) 2" x 10" rectangle (cut last week)
3" piece of ribbon
(5)  1/2" English Paper Piecing papers available HERE

You will also need for the applique either Vilene Sew in L11/310 or Bondaweb both available HERE.

APPLIQUE

There are many different methods for applique, which is great, because it means that there's a method for everyone.  Today I'm going to give two options for how to applique the Christmas tree, the interfacing method, which provides a neat finish and gives the impression of traditional needle turned applique (but believe me is a lot easier!) and raw edge applique.  I'm also going to share how I appliqued the sweet little hexies.

First off, we're going to need a template for the Christmas tree,  the Christmas tree is made up of three isosceles triangles placed one on top of the other and a piece of folded ribbon for the branch.

A. To make the template for the triangle, draw a horizontal line 2 inches long.
B. Bisect the horizontal line, by marking the center point and draw another line perpendicular to the original. (as indicated by the dashed line). On the vertical line, mark a point at 1 1/2" up from the horizontal line.
C. From the 1 1/2" mark to the corners of the horizontal  line, draw the final two sides of the triangle.

Please note the triangle template is the exact finished size, without any seam allowances.


You may want to make the template out of quilters template plastic, we have this in the shop, but due to the size and fragility can not post.... sorry!  Or do what quilters have done for years and use a cereal box.  Make sure you label the template so you know what project it is from and keep it safe ..... personally I keep mine in a pretty tin.....but you guessed that right?!

To applique my Christmas Tree I used the interfacing method.  This is my favourite method of applique.....here's some examples from previous projects including the Block of the Month quilt.


To use this method in addition to your fabric, you will also need a light weight sew in interfacing, I use Vilene Sew In L11/310.

Here's what you do.  Draw around the template, I use a pencil or Frixion marker, make sure your line is clearly visable.  Roughly cut out around the shape with no less that 1/2" seam allowance.  You will need 3 triangles.

Pin the vilene on to the right side of your fabric.  This method is great if you're looking to fussy cut as you can see through the vilene, which enables you centre the applique perfectly.  However for the tree fussy cutting is not required.


Using your sewing machine, sew on top of the drawn line, all the way round, stitch over your first few stitches to secure them.

A little happy tip.......make sure your stitch is nice and small, on my Janome I make it 1.5 and always start at the half way point on an edge rather than at a corner....both of these will ensure a strong seam!


Now carefully cut out the shape with an aprox 1/4" seam allowance.  I also like to trim the corners, cutting away some of the excess fabric, but be very careful not to cut too close to your stitches.

With small sharp scissors, cut a little cross in the centre of the interfacing then turn the applique through.  


Carefully using a pointed hera marker or as I do, a chopstick, to push out the corners..... be gentle and do not to push to hard or you will rip either the fabric or vilene. 


Press the applique on the fabric side.  Pin the triangles and the ribbon in place.....my Clover applique pins are perfect for this!  You can see from the picture that I overlapped the triangles by a smidge and the bottom triangle overlaps the raw edge of the ribbon by aprox 1/2".


Before I appliqued the triangles, I carefully lifted the bottom edge of the bottom triangle and added some additional stitches to the ribbon to secure it.  Using tiny little whip stitches applique in place.

A little happy tip...... For a lovely neat finish, I bring my needle up from the back of the background fabric skimming the side of the applique, rather than directly into the applique.  I then sew into the applique fabric and not through the vilene.  Then when you take the needle back down into the background fabric it will sandwich the vilene underneath, entirely out of sight. 

A note on the thread, I used 50wt Aurifil thread for my hand stitches......the applique rule being to use matching thread to the applique fabric rather than the background fabric.

Once you have finished the applique, press from the back rather than the front, which helps the appliques retain a slight puffy feel rather than flattening them, which I prefer.  

You could of course if you prefer machine the appliques in place, or use a decorative stitch such as Blanket Stitch, you can find a tutorial for this HERE.

So if you don't fancy the Interfacing method of applique, why not try raw edge applique using Bondaweb.  Bondaweb is a double sided adhesive.  I wrote a comprehensive tutorial for how to applique with Bondaweb a few years ago, which you can find HERE.   If you choose this method remember to secure your ribbon in place before ironing the triangles in place.

Moving on to the hexies.  First off you need to baste your fabric to your papers, on this occasion I chose to thread baste, can see how to do this HERE.  The basting stitches remain after removing the paper and help retain the hexie shape.

A little happy tip....punch a hole in your papers prior to basting and iron the hexies prior to removing the paper, the hole makes it easy to pop the papers out.

Centre the hexies in position, remember just like the tree to allow for the extra 1/4" seam allowance that will be taken up when you add the binding (on the right hand side).  Pin each individual hexie, then whip stitch in place.


I added some decorative stitches to my hexies using 12wt Aurifil #2021.  I simply added stitches starting a smidge in from each corner to the centre of the hexie as shown....


I hope that you'll join me next week when, I'll be sharing the embroidery patterns and don't forget Mum (Penny) and I would love to see your progress, so please do use the hashtags, so we can take a peek! 

#alittlehappysewalong or/and #prettyfabricsandtrims

Happy Stitches!
Share:
© A Little Happy Place | All rights reserved.
Blog Layout Created by pipdig