I'm really excited today to share my latest pattern and my first pattern that is 100% English Paper Pieced (EPP), it is called the Queens Walk Quilt. I really love EPP and actually my first quilts were all made using this technique, I only started to machine pieced quilts a few years ago, although hand sewing remains my true stitchy love. The original quilt design was inspired by memories of the beautiful tiled floor that I had in the house I lived in when I was first introduced to my husband Andy, a fair few years ago now! It started out as rough sketch scribbled on a notepad by my bed after a sleepless night....I even dream about quilts and pretty fabrics!
The block measures 10" square and comprises of 5 different shapes, based around an octagon at its centre. Within the block, I really wanted to be able to offer lots of opportunities to fussy cut fabric and by having the larger centre, this also gives an option to showcase some larger fabric designs which personally, whilst loving them, I find more difficult to use.
Obviously as soon as the papers arrived, I couldn't wait to sew a test block .. and chose a mix of Liberty Tana Lawns (now available on the website woohoo!!) and Amy Sinibaldi fabrics......
For this 'test' version I used two different prints for the triangles that make up point of the star...so pretty.... oh the relief when all the shapes fitted back together again and the maths had worked!
...and as if by magic and the aide of a little technology, I couldn't resist seeing what the start of a quilt would look like if you were to repeat the same fabrics across all the blocks.... I love all the secondary shapes that start to appear, the more blocks you add.
The quilt has a 30 block, 5 x 6 layout, which will measure 50" x 60", a nice throw size. For my version, I knew I wanted the palette to be my usual scrappy mix of pretty colours, pink, red, blue, green, yellow, ivory and little hints of purple, but veering towards to the more aged side of things...soft and gentle...you know so it looks like something that you inherited from your granny!
I've been using lots of Moda fabrics by designers including French General, Minick and Simpson, 3 Sisters, Brenda Riddle, Betsy Chutchian and new Moda designer Christopher Wilson Tate plus some of my favourite picks from across the shop...I can never resist adding pretty Lecien fabrics to a quilt!
Here's a close up of the blocks I've made so far, I've had lots of fun adding some fussy cuts in to the mix.......
The living room floor, always makes a good impromptu design wall to see how it's looking... with Poppy in full drawing mode next to it.... how earth she can draw laying down I do not know!
I'm absolutely loving the fabrics all together and sewing each block. Mum's also been joining in the fun too and has sewn some blocks for the quilt, the count currently stands at 11 out of 30......
We've also had some acrylic templates made. These have a 3/8" seam allowance included, which is my personal preference for EPP and alignment lines and a centre hole to aide fussy cutting. I can not tell you how helpful these are......they are not an essential and you can manage without them..... personally though, I think they just make the whole process so much easier and they definitely make fussy cutting and pattern repeating a doddle! You can use them with a Rotary cutter, but as you know, most of my sewing is done on the sofa, so I draw around them and then cut out the fabric using scissors.

I'm glue basting (I use a Sewline Glue Pen and blue refills), but obviously thread basting is an option. The trick with glue basting is not to over glue, I tend to sweep the glue pen firmly and with intent across the papers (not the fabric) just the once, the glue goes on blue and dries clear. This way, I then have no problems removing the papers at a later stage. Work around the papers basting one side at a time. Make sure that you wrap the fabric around the papers tightly, if the fabric is too lose then this can cause seams, when you're sewing the shapes together, to go off and therefore the overall block will not join together neatly. Also, this one is a 'do as I say not what I did' top tip...in my haste to get stitching I forgot.... but its really worth taking a moment to punch a hole in the centre of the papers before basting them, as this helps at the removing stage no end.
It's been a bit of trial and error to get the best layout out in terms of getting the seams to lay flat on the back, but I think I have now cracked it. The picture below shows how the seams will 'nest' together and then I've added some more detailed photos of each shape showing the order that I've basted the seams around each shape.
So here's Shape 1, the centre Octagon..... you can see how by using the acrylic templates I am able to easily centre the paper piece and get consistent seam allowances all round. You make one of these for the block.
Shape 2, which creates the band around the Octagon, I basted in two different ways, four of each. When you sew these together you alternate between the two.
Shape 3, is the triangle that forms the points of the star, these are also basted in two different ways.
Shape 4, is the kite shape that once added to shapes 1, 2 & 3, transforms the block back in to a larger Octagon
Shape 5 is a quarter square triangle and once added completes the block and squares it off.
Now for the fun bit, how I sew the shapes together. First off, lets talk about notions. You really do not need very much which makes EPP such a great choice for happy evening stitches and for sewing on the go! My thread of choice is Aurifil 50wt #2311, I have generally stuck to my favourite neutral shade for all my stitches as I have been joining various coloured fabrics together, however, if I was working on a group of same coloured fabrics then I would colour match my thread shade to fabric shade. I use a Clover Black/Gold Applique Sharp needle size 10, if you prefer a larger eye, check out our new Tulip Hiroshima Milliners Straw Needles #10 with a BIG EYE... I have received many glowing reviews for these and for some stitchers they use nothing else. You'll also need a sharp pair of little scissors.
If you are new to English Paper Piecing (EPP) here's how I sew the pieces together. I've borrowed the pictures below from my 'A little happy Tutorial ~ English Paper Piecing ~ How I Baste and Sew EPP Hexie's' which you can read in full
HERE, there's also more pictures on this post showing me glue basting, so well worth a look if your new to EPP. For the sewing part, to recap, my top tips would be, to start stitching a smidge in from the end (can you see my starting knot on the left hand side of the hexie below) and then work to the edge and back again. Make sure you use lots and lots of tiny little whip stitches, I think I average around 18/20 per inch, which literally just nip the fabric, try not to eat into the papers.

Can you see that even this example where I used black thread, the stitches are hardly visible... although bare in mind that the beauty of EPP is that it is handmade. Those little glimpses of the stitches simply prove this. There will be imperfections which just emphasise the love and time taken to make it!!!
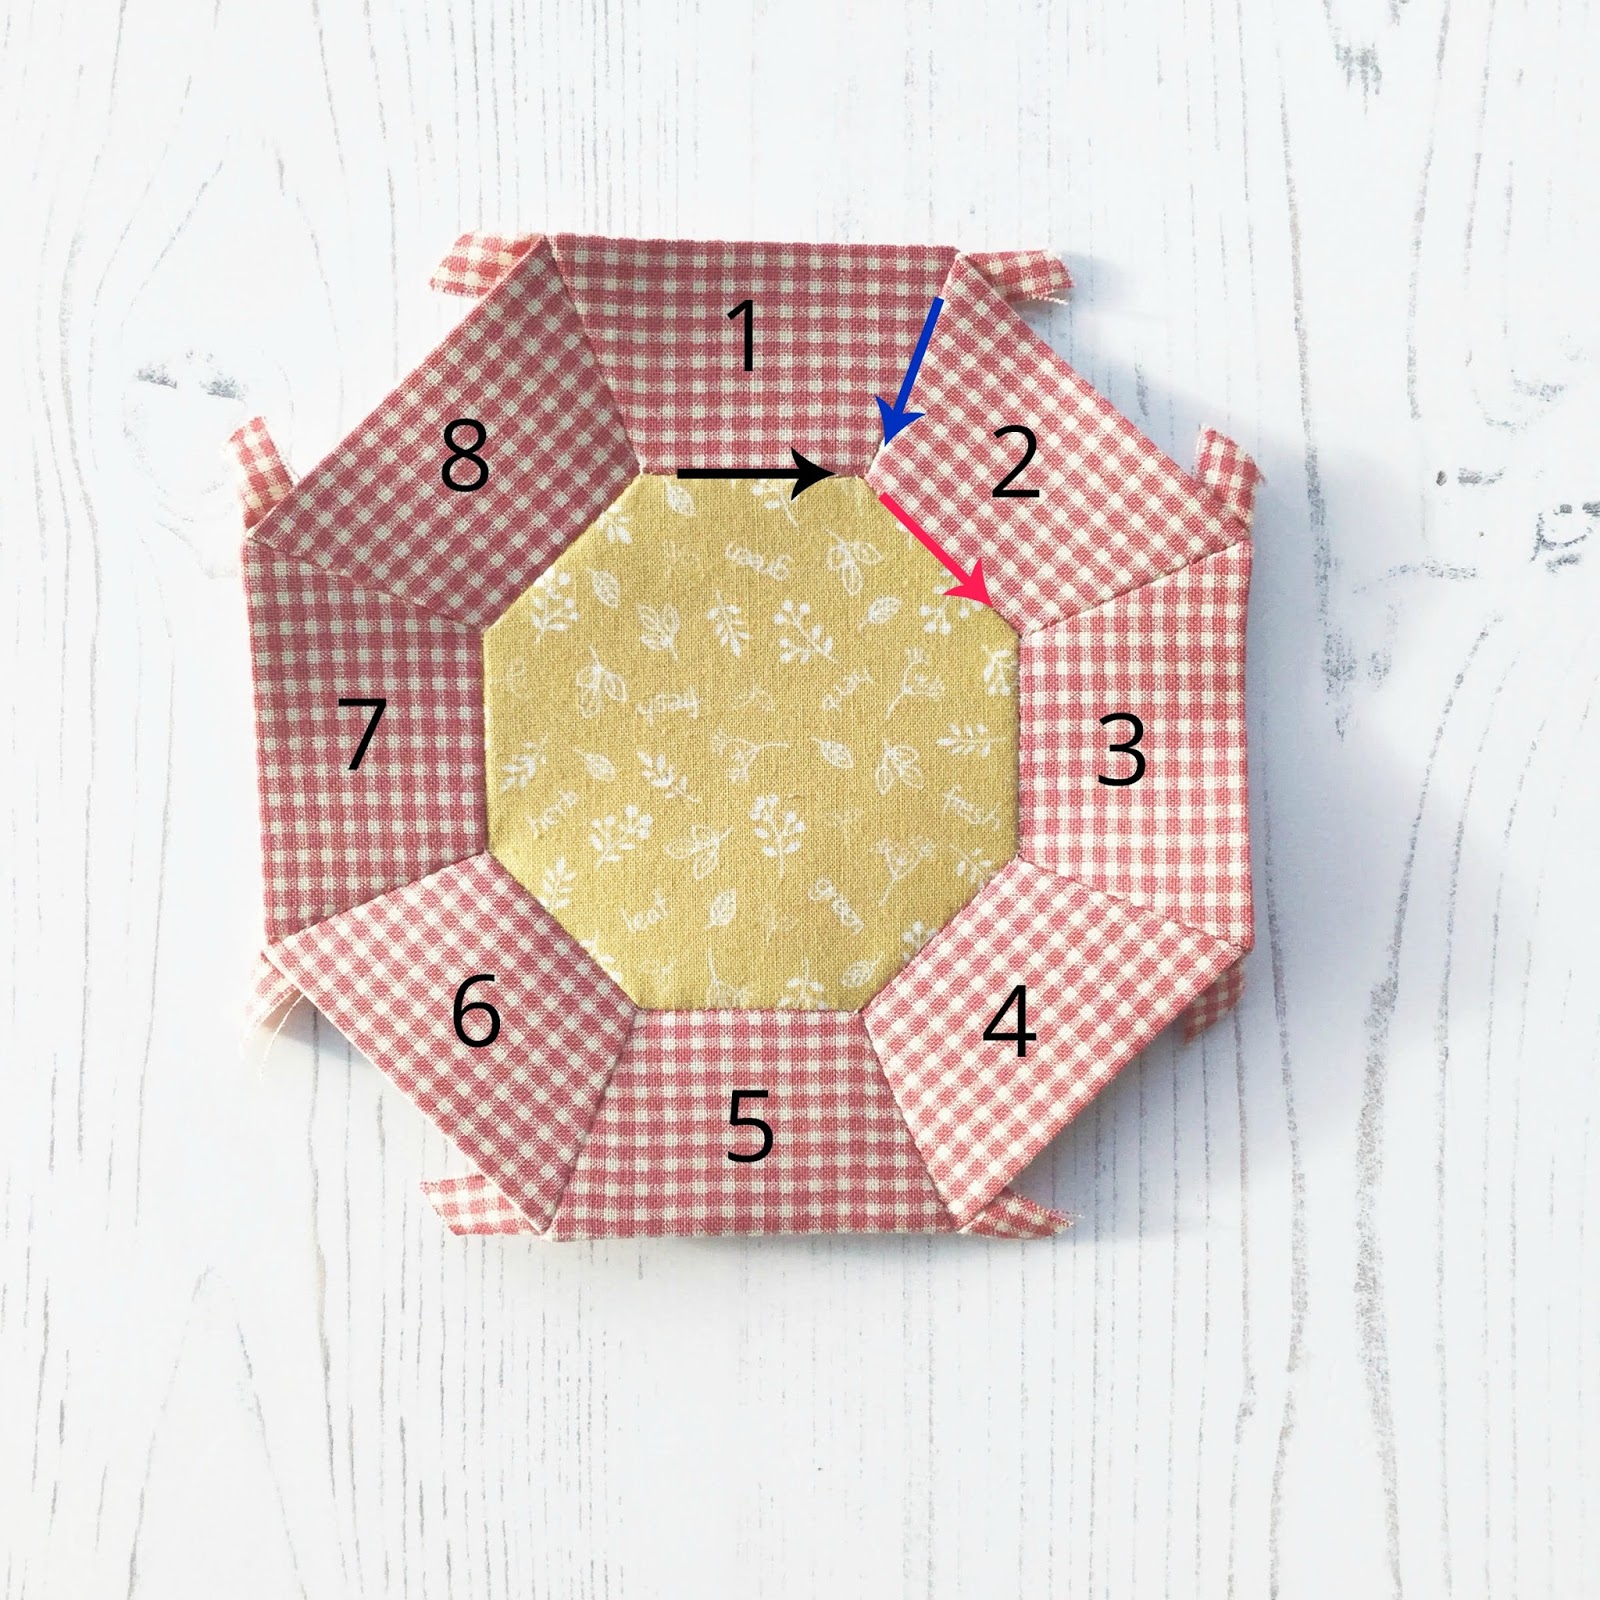
For the Queens Walk block, in the same way as I piece traditional hexies together, I started at the top (no1), stitched along the black arrow. Then for the second and subsequent pieces I stitched along two seams in one go, as indicated by the blue arrow followed by the red arrow. The important part is, that you take your time and line up your pieces that you intent to sew together accurately.
You'll find that you will at times have to bend the papers as you sew, that is absolutely fine.
Also note that when I knot off at the end of my stitches I like to leave a tail of thread approx. 1/2" long.
Once I added the first round of shapes to the centre Octagon, I then added four of the shape 3 triangles, if you refer to the layout picture above, you can see which ones from the two different basted versions I used.
Then to complete the inner Octogan, I sewed two of the Kite shape 4 pieces to the a remaining shape 3 Triangle. You can do this as one continuous piece of stitching rather than breaking your thread at the pointed tip of the triangle, as indicated by the arrows.
I then added this trio group to the main block. Again you can do this as a continuous line of stitching should you wish. Make sure that you line up the corners on each of the intersections, as indicated by the circles, this will ensure that everything matches up nice and neatly.
Finally, all that is required to complete the block is to add shape 5, the corner triangles. Ta Da a 10" square Queens Walk block.
Here's a picture of the back of the block, after I had carefully pressed it. Can you see how by nesting the seams they are laying nice and flat. When it comes to joining the blocks, I will need to press open the seams that are along the outer edge.
Just to clarify at what point to remove the papers, the general rule with EPP is not to remove a paper until it has something surrounding it on all sides. I'm leaving the papers in until I have completed all 30 blocks, as this will help keep the blocks stable and stop the fabrics from fraying excessively. If you're worrying about removing the papers if you have chosen to glue baste, I find that if you iron your work and then remove the papers whilst it still warm they pop out no problem.
I'm sure if you are an experienced EPPer this is all pretty self explanatory, but that being said, this is a totally doable block for a novice EPPer, so give it a go, although I must warn you it is rather addictive!
Once I have completed (with mum contributing too) all 30 blocks, I'll share a second post on how I will put it all together and finish it off.
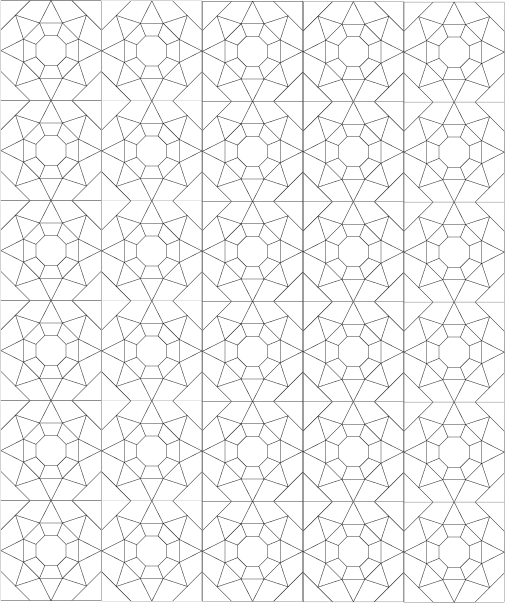
You may recall from the beginning of this post (sorry, I know I've been rabbiting on for quite some time!) that the papers came to us cut as a block, rather than as individual shapes. Having both been personally working on this, mum and I decided it was so much more convenient when it came to stitching to take a sheet and separate the 29 shapes within, as and when we were ready for them. They are really easy to separate, a bit like when you open a jigsaw puzzle for the first time and split up the pieces. With that in mind, rather than us sending you a bag full of 870 individual shapes, all mixed together, we have kept them 'as is'. The templates will also come carefully packaged in an appropriate size box. To help you plan, a colouring sheet is included with every box of paper pieces.
I hope that you love the pattern as much as I do and I can not wait to see your versions in your fabric choices! Remember to tag them with the following hashtags, so we can take a peek:
#QUEENSWALKQUILT and/or #PRETTYFABRICSANDTRIMS
Here's another block I made, using fabrics from the super pretty Bunnies and Blossoms collection that has just arrived. Imagine it in bright and cheery 30's reproductions or entirely from Liberty.....oh oh oh.......
So finally, here's a list and links to all of the Scrummy Supplies I've talked about today:
Queens Walk Quilt 30 Block Paper Piece Kit
Queens Walk Quilt 5 piece Acrylic Template Set
Glue Pens and Refills
Aurifil 50 wt thread
Clover Black/Gold Applique Sharp Needles #10
Tulip Hiroshima Milliners Straw Needles #10 with a BIG EYE
all available
HERE!
See you again soon!