20 December 2020

Christmas Charity Pattern ~ Advent Felt Christmas Decorations ~ Week 4


Welcome to week 4 our final week of our #alittlehappysewalong to make a set of pretty felt Advent decorations using our Christmas Charity Pattern.  

Coronavirus has greatly impacted on ALL our lives this year and has without doubt effected us all in different ways, for many causing moments of anxiety and uncertainty.  For those already living with mental health problems, it has been a particularly difficult year.  With Christmas approaching, the effects of the COVID 19 pandemic will be ongoing.

I have always believed that having a needle and thread in my hands contributes enormously to my general well being.  With this in mind I have designed a pretty set of Christmas Advent Felt decorations.  On each of the four Sundays throughout Advent,  I will be sharing the instructions and templates on our blog (alittlehappyplace.blogspot.co.uk), to make 6 little decorations, 24 ornaments in total.  

The pattern is free, BUT if at all possible, on this occasion we are also asking you to make a small charity donation to MIND through our Just Giving page... please give as much as you can... even £2 can make a difference!  

So far we have raised an AMAZING £1118!!!!

You can find the pattern for the first six decoration in last weeks post HERE, plus there is a list of supplies required and detailed instructions for how to stitch and finish the decorations.  The second set of decorations can be found HERE and the third set HERE.  So, without further ado, here's how I stitched this weeks ornaments.  

LETS GETS STITCHING!

First, you will need to print off the week 4 template sheet, which you can do so HERE.

This week, we're going to make a robin, a toadstool, a Christmas tree, a reindeer, a tomte and a sprig of holly.  Below is a breakdown of the order in which I made each one, then complete, using the construction instructions from week 1.

ROBIN ~ First applique the robin shape, followed by the red breast.  Then add the wing, securing with Over Stitch across the top edge only.  Next, applique the heart to the wing.   You could if you wish add a little button or embroider an eye.


TOADSTOOL ~ First applique the main toadstool shape.  Then, applique the cap, adding a scattering of white French Knots.  Finally, add some straight stitches from the top of the stem to the base of the cap, radiating in a fan shape.


CHRISTMAS TREE ~ First applique the tree shape, then add then decorate with Cross Stitch 'twinkly lights'.


REINDEER ~ First applique the reindeer shape.  Then, add the heart to the centre.  For Rudolph, add a teeny red button or little red circle for his nose.


TOMTE ~ First applique the main tomte shape, then add the beard, followed by the hat, which overlaps the top of the beard.  Next add the nose and finally a jingly bell at the top of his hat.


HOLLY ~ First applique the three holly leaves with a line of Back Stitch down the centre.  Then add the berries.


That's it.... I hope that you enjoy stitching your final set of decorations.  


Mum and I would LOVE to see your completed sets, so, if you're sewing along and sharing on social media please use the hashtags:

#alittlehappysewalong or/and #prettyfabricsandtrims

Alternatively, please do send us a photo!

Finally, please remember if you can, to make a donation, the smallest amount will make a huge to difference to someone in need.........


Very best wishes and happy stitches,
Sarah xo
Share:

13 December 2020

Christmas Charity Pattern ~ Advent Felt Christmas Decorations ~ Week 3


Welcome to week 3 of our #alittlehappysewalong to make a set of pretty felt Advent decorations using our Christmas Charity Pattern.  

Coronavirus has greatly impacted on ALL our lives this year and has without doubt effected us all in different ways, for many causing moments of anxiety and uncertainty.  For those already living with mental health problems, it has been a particularly difficult year.  With Christmas approaching, the effects of the COVID 19 pandemic will be ongoing.

I have always believed that having a needle and thread in my hands contributes enormously to my general well being.  With this in mind I have designed a pretty set of Christmas Advent Felt decorations.  On each of the four Sundays throughout Advent,  I will be sharing the instructions and templates on our blog (alittlehappyplace.blogspot.co.uk), to make 6 little decorations, 24 ornaments in total.  

The pattern is free, BUT if at all possible, on this occasion we are also asking you to make a small charity donation to MIND through our Just Giving page...So far we have raised an amazing £1029... but please let's not stop, if you haven't donated already please give as much as you can... even £2 can make a difference!  

You can find the pattern for the first six decoration HERE, plus there is a list of supplies required and detailed instructions for how to stitch and finish the decorations.  The second set of decorations can be found HERE.  So, without further ado, here's how I stitched this weeks ornaments.  

LETS GETS STITCHING!

First, you will need to print off the week 3 template sheet, which you can do so HERE.

This week, we're going to make a Christmas pudding, a gingerbread man, a cookie, a dove, a mitten and a candle.  Below is a breakdown of the order in which I made each one, then complete, using the construction instructions from week 1.

CHRISTMAS PUDDING ~ First applique the pudding shape, followed by the cream.  Add little decorative Cross Stitches in a contrasting shade on the pudding.  Next add the two holly leaves which I appliqued with a line of Back Stitch down the centre.  Finally, add a teeny red button for the berry.   


GINGERBREAD MAN ~ First applique the gingerbread shape.  Then, add two French knots for the eyes and Back Stitch for the mouth.  Using an ordinary red colouring pencil, add two little rosy cheeks.  Its a good idea to practice on some gash felt and build up the colour gently.  Finally add a couple of teeny white buttons to his tummy.


COOKIE ~ First applique the cookie shape, then add the icing.  Decorate with Cross Stitch sprinkles.


DOVE ~ First applique the dove shape.  Then, add the wing secured in place with little Cross Stitches down the centre.  Add Straight Stitches in grey thread for the tail feathers. 


MITTEN ~ First applique the mitten shape, then add some decorative stitches in contrasting thread to the centre.  I made a a little star with Straight Stitches and added a border in Back Stitches and Cross Stitches on the cuff.


CANDLE ~ First applique the candle shape.  Next, applique the candle holder.  I then added a flame in pale pink thread in Straight Stitches.


That's it for week three, I hope that you enjoy stitching your second set of decorations.  Here's a recap of the schedule:

  • Week 1 ~ Sunday 29th November 2020
  • Week 2 ~ Sunday 6th December 2020
  • Week 3 ~ Sunday 13th December 2020
  • Week 4 ~ Sunday 20th December 2020

If you're sewing along and sharing on social media please use the hashtags:

#alittlehappysewalong or/and #prettyfabricsandtrims

Finally, please remember if you can, to make a donation, the smallest amount will make a huge to difference to someone in need.........


Very best wishes and happy stitches,
Sarah xo
Share:

6 December 2020

Christmas Charity Pattern ~ Advent Felt Christmas Decorations ~ Week 2


Welcome to week 2 of our #alittlehappysewalong to make a set of pretty felt Advent decorations using our Christmas Charity Pattern.  

Coronavirus has greatly impacted on ALL our lives this year and has without doubt effected us all in different ways, for many causing moments of anxiety and uncertainty.  For those already living with mental health problems, it has been a particularly difficult year.  With Christmas approaching, the effects of the COVID 19 pandemic will be ongoing.

I have always believed that having a needle and thread in my hands contributes enormously to my general well being.  With this in mind I have designed a pretty set of Christmas Advent Felt decorations.  On each of the four Sundays throughout Advent,  I will be sharing the instructions and templates on our blog (alittlehappyplace.blogspot.co.uk), to make 6 little decorations, 24 ornaments in total.  

The pattern is free, BUT if at all possible, on this occasion we are also asking you to make a small charity donation to MIND through our Just Giving page. So far we have raised an amazing £844... but please let's not stop, if you haven't donated already please give as much as you can... even £2 can make a difference! 

You can find the pattern for the first six decoration in last weeks post HERE, plus there is a list of supplies required and detailed instructions for how to stitch and finish the decorations.  So, without further ado, here's how I stitched this week's ornaments.  

LETS GETS STITCHING!

First, you will need to print off the week 2 template sheet, which you can do so HERE.

This week, we're going to make a bell, a little zinc house, a snowflake, a dala horse, a star and a bauble.  Below is a breakdown of the order in which I made each one, then complete, using the construction instructions from week 1.

BELL ~ First applique the bell shape.  Then, add in a contrasting colour little decorative Cross Stitches along the bottom.


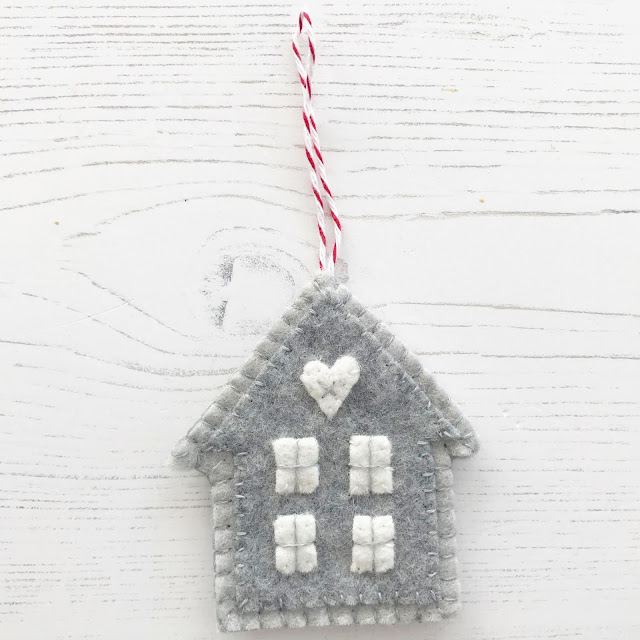
ZINC HOUSE ~ First applique the house shape.  Then, add the windows, I added two decorative Straight Stitches in grey thread for the window panes. Finally add the heart and pop a little Cross Stitch in the centre.


SNOWFLAKE ~ Using the photo of the completed decoration as a guide, draw the lines on the snowflake circle using an erasable fabric marker (remember to do a test on some gash felt first).  Pin the circle to the background piece of felt.  Then rather than the usual Over Stitch to applique it to the background, instead stitch directly on top of the lines in a contrasting thread in a decorative stitch of choice, I used Fly Stitch.  Once appliqued, simply cut around the perimeter of the background felt of leaving a scant ¼” border of the background felt as normal, then, in addition carefully cut away the felt on the appliqued circle (not the background felt) either side of the stitches, taking care not to cut through the stitches. Complete the decoration as normal.


DALA HORSE ~ First applique the horse shape.  Then, add the mane and saddle.  Add the little heart on top of the saddle, with a decorative Cross Stitch at it's centre.  Followed by two long Straight Stitches for the bridle.  To complete add little Cross Stitches on each leg. 


STAR ~ First applique the main star shape, then add some decorative stitches in contrasting thread to the centre.  I made a a little star with Straight Stitches.


BAUBLE ~ First applique the bauble shape.  Then, add the heart to the centre.  I then added some decorative embroidery using a mix of Running Stitch and Cross Stitch.


That's it for week two, I hope that you enjoy stitching your second set of decorations.  Here's a recap of the schedule:


If you're sewing along and sharing on social media please use the hashtags:

#alittlehappysewalong or/and #prettyfabricsandtrims

Finally, please remember if you can, to make a donation, the smallest amount will make a huge to difference to someone in need.........


Very best wishes and happy stitches,
Sarah xo
Share:
© A Little Happy Place | All rights reserved.
Blog Layout Created by pipdig