29 November 2018

A little happy tutorial ~ Rainbow Kisses Quilt Part 2


Today, I'm sharing the second instalment of the 'a little happy' tutorial for the Rainbow Kisses Quilt.  You can read all about this pretty quilt and find step one HERE.  Hopefully you've all been busy and enjoying making your 9 patch units.  Today I'll be sharing the templates and instructions for the centre applique panel.

Before sharing the pattern, here are some notes that may assist you.  I am using the Freezer Paper method of applique, you can read all about this method HERE.  Feel free however, to use your own preferred method, for example, interfacing method or raw edge applique.  Remember the Applique Templates are the finished size and do not include seam allowances.  

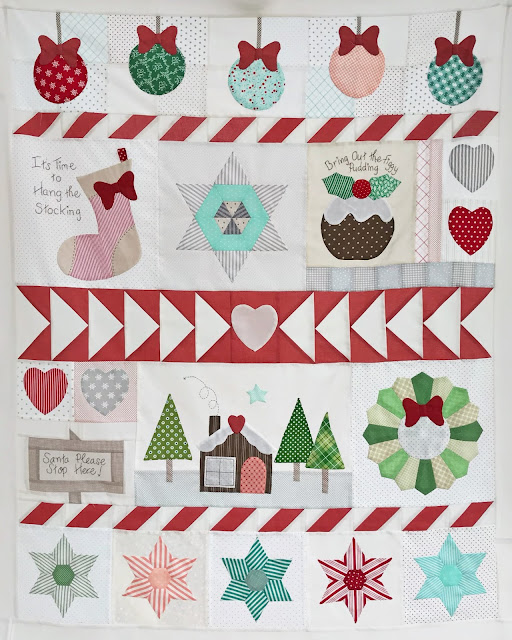
Here's a reminder of the quilt that we're making.......


BEFORE STARTING Always Remember to:

1. Read all instructions before you begin.
2. RST means right sides together.
3. All seam allowances are  1/4”.
4. FWOF means width of fabric.
5. If you need help, please do get in touch!

So to start, you will need to print THIS SHEET, which includes the applique templates.  You'll also need to gather your applique supplies for your chosen method, threads (I'm using Aurifil 80wt thread with a Clover Black/Gold applique/sharp needle) and of course your pretty fabrics.

Rather than going to scrappy for this element of the quilt, I've chosen three shades of green for the leaves and stems, and two different fabrics in red, yellow, blue and purple for each flower.  You could of course be as colourful and scrappy as you wish!  The background fabric I've used is Bella Solid in Off White.


CUTTING INSTRUCTIONS

  • From the background fabric cut (1) 24" square
  • From the stem fabric cut (4) 5/8" x 10" rectangles

For the appliques, prepare in your chosen method:
  • From each of (4) fabrics prepare (1) centre petal 
  • From each of (4) fabrics prepare (1) left petal and (1) right petal 
  • From each of (2) fabrics prepare (4) left leaves and (4) right leaves 


PIECING INSTRUCTIONS....Let’s get stitching!

First off prepare your background fabric.   Fold the square on the diagonal from corner to corner and finger crease the fold.  Repeat on the opposite diagonal.  Please note: This will be trimmed to 23" once you have appliqued the flowers.  You can if you wish draw the 23" square on the fabric, taking care to keep it centred. 

Next prepare 4 stems, then trim these to 9 1/2" long.  I used a Clover 1/4" Bias Maker.....for a detailed 'a little happy' tutorial click HERE.  Please note for the Rainbow Kisses quilt the stems are straight, therefore unlike those in the tutorial, it does not need to be cut on the bias.

Position and applique* the stems on the diagonal, using the crease marks on the background fabric as a guide.  Tuck under the raw edge nearest the centre and once appliqued the stem should be positioned 2" from centre.  You don't need to worry about tucking under the raw edge at the other end as it will be concealed under the flower.

Remember for a neat finish, colour match your thread to the applique fabric rather than the background fabric.


Using the photo below as a guide, you can now position and applique the leaves and flowers.


For the flowers, first applique the centre petal, then the left hand petal and finally the right hand petal.


For the leaves, I chose to overlap the stems, but you could position them either side if you prefer. 


Once everything has been appliqued, trim the background fabric to 23" square, taking care to keep your appliques centred.

The next instalment of the Rainbow Kisses quilt will be in January 2019, when I'll be sharing the instructions for the grey border and putting it all together.  I'll also be thinking about quilting ideas.  

Wishing you as always, lots of happy stitches!
Share:

9 November 2018

Liberty Periodical ~ Block of the Month Club

Today, I'm sharing my brand new quilt design which I've called the 'Liberty Periodical', which we will be offering as a Block of the Month club starting in January.  I have become more and more in love with applique in recent years and with the arrival of Liberty Tana Lawns in to the Pretty Fabrics and Trims workshop stash, the time seemed right to design an applique dominent quilt.  The first stitch went in to this quilt back in January and throughout the year I have savoured each and every stitch.... it really has been a complete pleasure to design and sew.  My plan now, is to hand quilt it throughout the winter months, I'm not really in a rush as to be honest, part of me doesn't want the process of making it to end.

As the name suggests, the quilt will take you on a monthly journey celebrating the seasons, events and special holidays that we enjoy throughout the year.  Each month is represented by a pretty appliqued block, nestled amongst a machine pieced Irish chain block.   The feature fabrics will be all Liberty of London Tana Lawns, combined with a super soft Art Gallery Pure Elements 'off white' background......a perfect foil to set off all the beautiful tana lawns ... the absolute stars of the show!

Here's some close up pictures of my completed quilt top.......


If you love lots of happy hand hand stitches, you will absolutely love sewing this quilt.  As I have done before, I thought it would be useful to do a Q&A to cover some of the questions that you may have about the Block of the Month......

What is a Block Of The Month (BOM) Club and how does it work?

A block of the month is a monthly parcel full of loveliness that you will receive directly through your letterbox. It will include all the fabrics and if required, applique templates or English Paper Pieces for you to sew that months blocks, plus of course detailed instructions for how to piece the block will also be included. Don't forget there are also various 'a little happy tutorials' and handy tips on the blog to help you along the way.

The 'Liberty Periodical' Block of the Month, is a 12 Month subscription running from January 2019 up to and including December 2019.   Each month you will make one applique block and one chain block (in the final month you will also make a extra chain block).  At the end of the term you will have received enough pretty fabric and instructions to make your very own 'Liberty Periodical' Quilt Top.  

How big is the finished Quilt?

The Quilt measures 60" x 60"

What techniques will be used?

The quilt combines a mix of Applique*, a little English Paper Piecing and Machine Piecing.

*I used the Needle Turn method for the applique, for which you can find a detailed 'little happy' tutorial HERE which shows my preferred method.  


Will I receive exactly the same fabrics as used in the sample?

I made my quilt top from my personal collection of Liberty Tana Lawns which I have collected over the years.  Mum and I will be selecting beautiful Tana Lawns from the current Classics and Seasonal collections for the Club... but rest assured they will be equally as scrumptious!

What other supplies will I need?

~ EPP Supplies, for example glue pen & glue refills if you wish to glue baste or thread if you plan on thread basting, however all the papers are supplied.

~ Thread, I used Aurifil 50wt #2311 in my machine and then switched to alternative colours to match the Liberty fabrics for the English Paper Piecing.  For the Applique, I used Aurifil 80wt in shades to match the Liberty fabrics

~ Tools, 1/4" Bias Binding maker and your usual patchwork and sewing related tools.

~ To complete your quilt, you will need wadding, backing fabric and binding fabric of your choice.

Can I purchase the pattern on its own?

No, not at this moment in time......many hours have been spent designing this quilt specifically for our inaugural Block of the Month Club......Sorry!

How much does the Club cost?
  
The monthly Club cost including postage is:

UK Club Price ~ £18.75 (Via 1st Class Mail)

EU Club Price ~ £21.75 (Via Standard Airmail*)  

International Club Price ~ £23.25 (Via Standard Airmail*)

*Should you wish to upgrade to Priority Mail for your parcel full of loveliness please do get in touch.

HOW CAN I JOIN?

Places for the club are limited and all our friends and customers from across the world are invited.


If that wasn't enough, we're also re running our popular 'A Little Happy Christmas' Block of the Month, in a fresh new colour scheme........


Mum and I hope that you will join us in stitching along and if in the meanwhile, you have any questions, as always please do not hesitate to get in touch!

Share:
© A Little Happy Place | All rights reserved.
Blog Layout Created by pipdig