30 March 2014

A Pretty Felt Bow Brooch Tutorial


I thought I would share a really quick and easy project with you.  Mum mentioned last year when I was busy making hair clips for Poppy's party that she would love a version as a brooch.  Great idea I thought.... so here's what I made as a gift for her for Mothers day.

To start off with, you'll need to print off the pattern.  To do so, highlight the picture below, then 'Right' click on your mouse, then select 'Open in a new window' and then print using the keys 'CTRL' and 'P'.  Please feel free to re-size the pattern should you wish.


Let's get started........ 

A little note on felt...there are many types of felt available.......acrylic felt, wool felt, soft wool/synthetic blend felt, however my personal preference is for a wool/rayon blend felt.


Stitch through all the layers, to create the main bow.
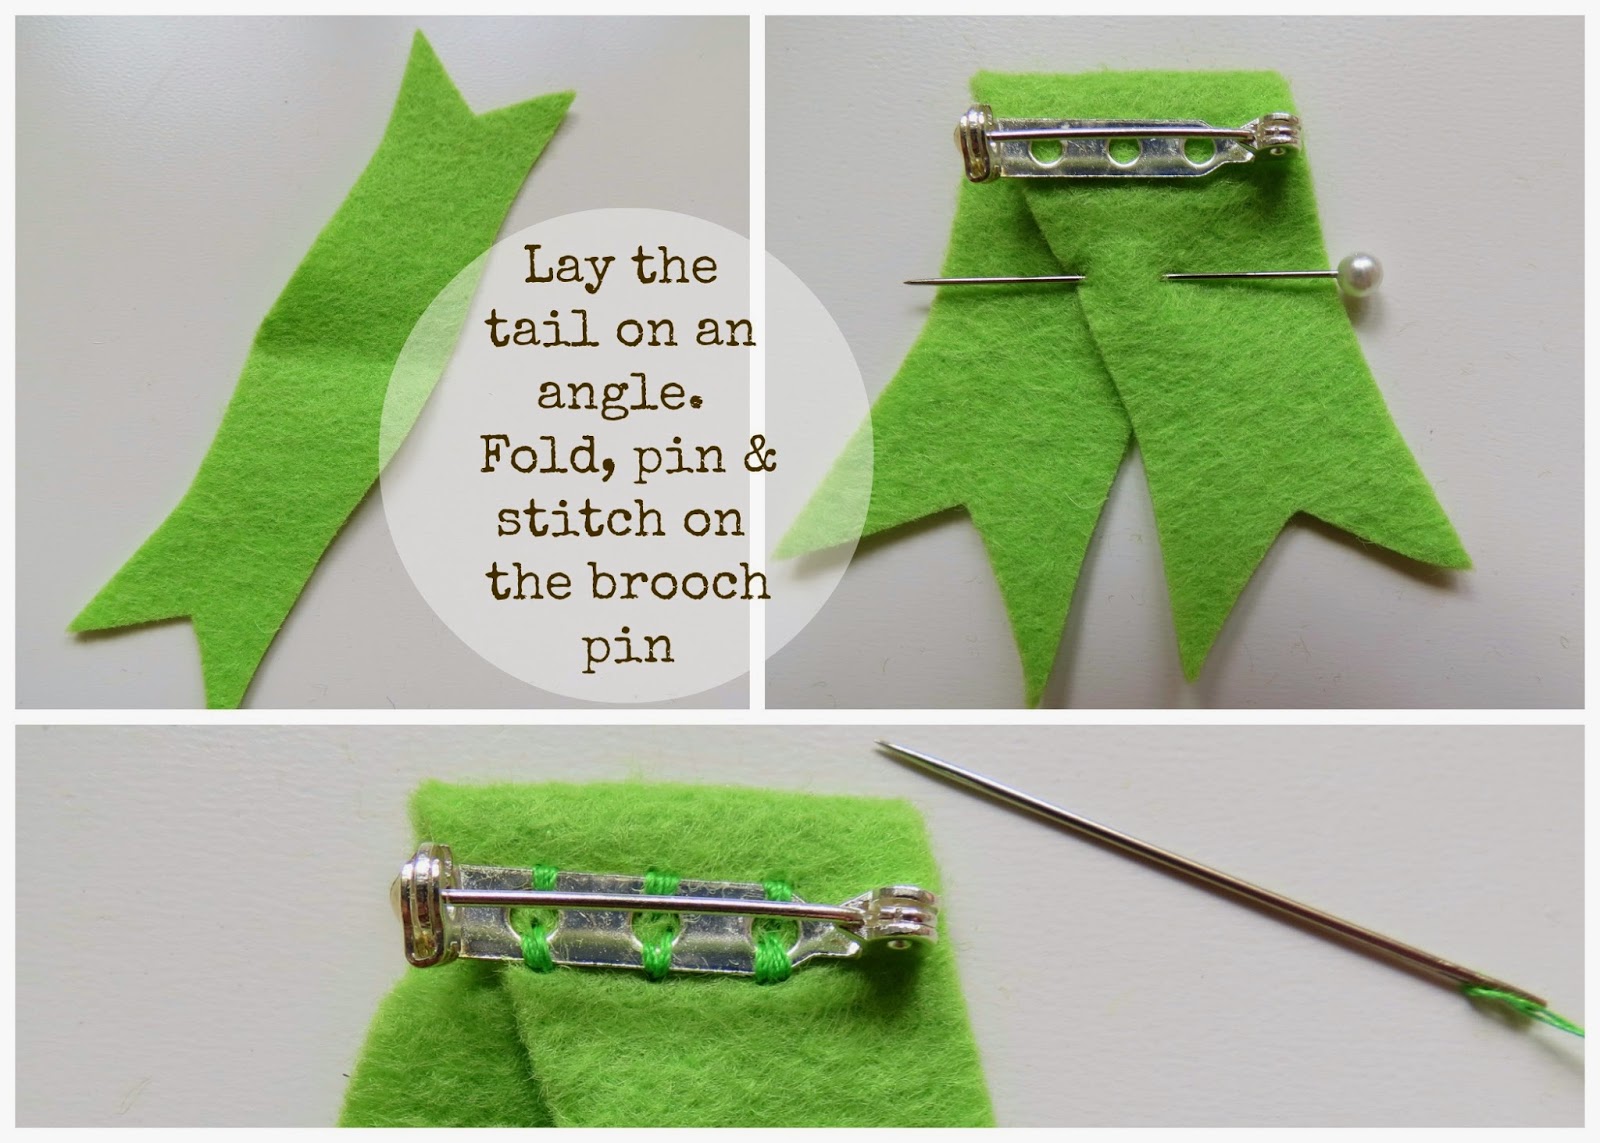
Now we're moving on to the loop...

Just a little note...make sure that your stitches go through the loop and the back of the bow only, you do not want to see them from the front.
The stitches securing the brooch pin will hold the tail neatly in position.
As you did before, make sure these stitches go through the tail and the back of the bow, you do not want to see them from the front......  (sorry I know I'm repeating myself!)

.....and that's it you're all done!

I hope you enjoyed the tutorial and feel tempted to give it a go......let me know how you get on and if you have any questions, please do not hesitate to ask!  Right I'm off to make one for myself and to eat the chocolates Poppy and Jamie got me for Mothers Day.  I hope that if you're a Mum you too have had a lovely day!
Share:

26 March 2014

Ta Dah.....


Poppy's new ballet bag is finished and I'm pleased to report that it's a hit!!

It's been 11 months since I made the huge changes to gain a more balanced working/family life.  One of the many things that has subsequently given me so much pleasure, is finding the time to make things for my family and home.  I can not believe that Poppy is 6 already, I was so precariously in danger of her growing up and missing the opportunity to make her pretty and sweet things.  Thank goodness I came to my senses in time.

Sorry.... I digress, I loved stitching this embroidery, for one it was relatively quick, it was also a change to use just one colour of thread, rather than creating one of my usual colourful creations.  I did however stick to my favourite stitches..... back stitch in the main, lazy daisies on the border, satin stitch for the eyes and french knots for the details on the dress.  

To make the bag I raided the shelves of Pretty Fabrics and Trims (I know I'm a very lucky lady!!)  I used a combination of pretty Tilda fabrics...

..... added a few wooden buttons, a loop of pretty ribbon....
and a touch of decorative hand quilting....I do love hand quilting!!
When it came the handles I stitched ribbon to cotton webbing, quick and pretty...win win .....

......I was thinking of writing a tutorial for how I make my tote bags......would you like that? Let me know.

Thank you as always to listening to my ramblings, it's so lovely to share them with you and to hear what you think.   I'll be back soon, with a crochet update.....my little pile of grannies is growing!

Share:

24 March 2014

A little makeover...


Remember my sewing chair from my little tour post.  I grew up sitting on this chair as it came from my parents first dining room set.  It has been reupholstered many times in its long life and to be fair was overdue another.  So this weekend out came some of my favourite Cath Kidston florals.......
 and with a lick of pretty pink paint.......
it was transformed!

Next up, the chest of drawer to the left of my chair and the little wooden ones under the table.  Thanks as always for all your lovely comments on my last post!  I'll be back soon with a Ta Dah moment, as I've also finished Poppy's ballet bag.  I hope that you had a lovely weekend.


Share:

19 March 2014

That moment....


........ when you've done all your chores, everyone is content with what they are doing and you take the opportunity to sit down in the peace and quiet with a hot mug of tea.  You open your bag, you feel like a child opening your Christmas stocking, and with delight pull out a stack of completed little Granny Squares. You pick up your hook, choose your yarn and set to quietly creating the next little square of joy.  That's the moment and it makes me very happy....... very happy indeed.


:: Linking up with Chrissie
Share:

16 March 2014

A little Sunday Stitching....


Remember the little fairy I sketched and started embroidering a few weeks ago, well I finally got round to finishing her.  She's stitched on a piece of pale pink linen I had lurking in my stash and I used 2 strands of lovely chocolate brown embroidery thread.  She's taking pride of place on a little bag I'm making  for Poppy to take her tap and ballet shoes to her dance classes........

I just need to add a little hand quilting and then it should come together quickly...well that is along as I do not get distracted by Granny squares!  Enjoy your Sunday evening.

:: Linking up with the lovely Chrissie.


Share:

15 March 2014

A mini makeover.......


Like many families working on quite a tight budget, clothes don't rank highly in our priorities, helped by the fact that Andy wears a uniform and working for myself, I generally live in jeans and cardi's.  The biggest clothing expense that we have though is school uniforms.  Like many therefore, when I can pick up a bargain in the sale I tend to stock up on larger sizes for future school years.  A good plan you would think..... except when the school changes its uniform and we went from navy blue to royal blue....blow!!  

This sweet cardi was luckily the only casualty and at £2 in the sale not a problem.  It's rather lovely in its own right and being cotton is so soft, I decided though that a little bit of pimping up might be in order.......... so I grabbed some ribbon and buttons and spent half an hour stitching and I was done .........
..I think she likes it..... it cheered her up when she returned home from a scoot with a cut knee.....


Next on the agenda to be pimped up, a thrifted cord skirt.  Thank you so much for all you lovely comments on my cowl...I'm inspired and it has to be said hooked... more granny squares are already in progress... and just look what Mum gave me yesterday....her stash of cotton yarn.....oh lucky lucky me....Mum's really are the best!!


Have a lovely weekend what ever you are up to.


Share:

11 March 2014

A Ta Dah..........


Did you hear me squeal last night........well it was probably more of a sigh of relief.  Back in the summer I took a bag of yarn on holiday and with the help of mum learnt to crochet.  As my first project I decided, why not make a blanket......I returned from holiday and carried on making the squares.  My bag of crochet came on several days out and as the Autumn evenings turned cooler, my little pile grew, until whoosh, one night I felt totally overwhelmed.......a blanket was I mad, at the speed I was going it would take years to complete..... so faced with this enormous task, I did what every sensible person does.... packed it up and put it away.  Every now and then I would take a peek inside the bag and touch the lovely soft cotton and then I would zip it up and forget all about it.

Weeks turned in to months until Friday night, I unzipped the bag, actually took the squares out, lay them on the floor and all of a sudden I knew what to do......I needed to have a finished project, something that could be easily and quickly achieved...a scarf...no, a cowl.  So this weekend I set too sewing the squares together, there's no set pattern, I simply picked the best and most even of what I had made and made sure that the same colour didn't touch.   I then added a pretty scallop border which I found HERE and Ta Dah....my first ever completed crochet project.........


It's bright and colourful and has made me very happy indeed..........oh yes!!


 From what I have left......this little stack of squares will at some point become another scarf or cowl ......

........but remaining squares, the ones where the tension was a bit a rubbish, I am going to pull them apart and have a go at making something like this cushion (it's from an old edition of Molly Makes)


and Amy has also written a fabulous tutorial for some wrist warmers that I'm going to attempt......but just because, here's one last photo..........


Thank you as always for visiting me here and for your kind comments ( please go easy on me this time and don't look to closely at the squares!)
:: Linking up with Chrissie 
Share:

7 March 2014

A gaggle of geese.....


.......but most definitely not of the honking kind.

 I have finally started my very first Quilt A-Long....although in truth, I should probably call it an 'Almost' Quilt A-Long as I am quite a few weeks behind everyone else.....however  better late than never....hummm I think I said that about my Farmers Wife Quilt...oh well!

The first task was to cut up all your fabric for the quilt top. I'm making the 3 x3 block which will finish up 54" square....a perfect lap quilt to live on the sofa in my kitchen.  I'm using prints from the Aunt Grace Miniatures collection and for the background a vintage cotton sheet.   This is the first time I have ever cut up all my fabric for a quilting project in one go, I'm normally a cut as you go girl!  There was however something very satisfying I must say, once I had my stacks of little squares all piled up.


It was then time to get stitching.   The best part of participating in this QAL is to learn new skills and straight away I have learnt how to make No Waste Flying Geese.  Obviously... I am already dreaming up projects where I can use these again........ At this point I must say a huge thank you to Melissa who is running the QAL and so generously sharing her knowledge!

After a couple of hours I ended up with 72 little blocks......


......can you tell I'm rather chuffed with these little beauties...... I love the scale of these prints, so pretty!


The next task is Half Square Triangles AND I get to do some colouring....does it get any better than that!!

Share:
© A Little Happy Place | All rights reserved.
Blog Layout Created by pipdig