25 October 2013

Bloomin' Marvelous


So what do you do when your husband is on night shift, do you:

a. do some much needed book work
b. finish off some works in progress
c. watch tv followed by an early night in bed


Noooooooo, you have lots of fun making little ickle crochet flowers!  Are they not just the cutest thing ever!

Being new to crochet  these are the first thing I have made all by myself following a pattern, which I found here.   Now do not look to closely as some of them have 6 petals rather than the correct 5 and the cotton yarn splits ever so easy, but I love them all the same......


So what do I do with them now, apart from arrange them in pretty colours.....


and add buttons from my stash........


Well Lucy from Attic 24, made hers into the prettiest of brooches, so I am definitely going to do that, all be it, I just couldn't master the crochet leaves, so mine will have felt ones.  Poppy has her eye on the pink ones, so I am going to add them to some hair clips and the rest...well I think I'll just sit and admire.

Have a fab weekend!


Share:

22 October 2013

A Ta Dah moment

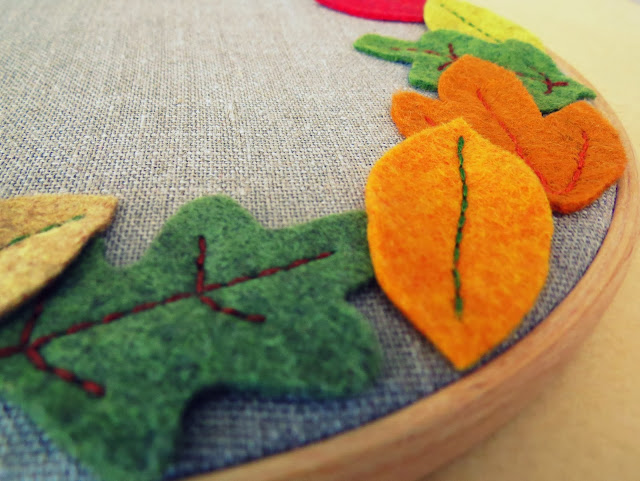
Generally when I have an idea, I'll sit and draw, scrub it out, start again, throw it away, start again, be happy, draft pattern pieces, make a prototype, re draft and so the process continues.  Last weekend however I had an idea, I drew a picture, drafted the pattern pieces and stitched and then I had a Ta Dah moment................


I was completely, utterly, happy first time round.............


You could have knocked me over with a feather.  Now I must say that I was extremely tempted to add more details, maybe an acorn here and there, a toadstool or two, possible some writing in the middle, however I resisted the urge*. This is a perfect project for all levels of stitchers, the leaves themselves are appliqued using Back Stitch ( You can see a tutorial on this HERE )


Instructions are also included on how to finish the back of the hoop nice and neatly with a felt cover.


I've written up the pattern which is now available on my website HERE.  If you do decided to stitch it, please do send me your pictures, I would love to see!!


* When I shared a little preview of the design on my Facebook page, one of my lovely Facebook friends, did comment that it would look gorgeous with the word 'thankful' embroidered in the centre.  So I adapted this from my 'be thankful always' design.....


Share:

20 October 2013

Weekending


Our weekend came early this week due to Andy's shift pattern and rather conveniently the children starting half term on Friday.  After the usual food shop, a bit of a tidy around, ballet classes etc we couldn't wait to get outside.

We headed for Woodland Waters, which is a camping and fishing site about 10 minutes from home.  We are so lucky to have so many pretty places to visit just a short hop away.  I often wonder how long our family walks will continue,  before it is not cool to be out with mum and dad?  I hope for a long time to come. Woodland Waters is just lovely, there are several tree lined lakes to walk around and it is always full with people angling, I do kind of like the idea of fishing, sitting by a lake, on a dry day of course, for hours on end, in the peace and quiet, day dreaming, well that's how I imagine it anyway, although I am sure a professional angler will tell me there is lots more to it!!


The air was crisp and the ground was covered in a carpet of leaves, poking through were the most amazing toadstools, so many different types...


These ones below made me think of the film 'Journey to the centre of the Earth' you know the bit when they discover the field of ginormous mushrooms......


I would love to do a foraging course and discover which mushrooms are safe to eat, however until such a time we obviously did not touch any of these and I suspect despite looking like fairy houses, the red ones were almost certainly poisonous. 

We did however satisfy our foraging urge and rootled for safe Autumn treasures to add to our growing collection at home...... 


Autumn is such an inspiring season do you not agree, I think it's the rich warming colours, the textures and shapes, it certainly lifts my spirits and inspires me more than any other time of year.


Yes, despite a growing number of works in progress, I felt the urge to start something new and such fun it is too!

Share:

18 October 2013

How I transfer an embroidery pattern


I am often asked how do I transfer my embroidery patterns....now there are lots of different ways out there, you can use embroidery tracing paper, freezer paper or a heat transfer pencil, however for the method that I use time and time again, you simply need a nice bright window and a transfer pen of your choice.  This is what I do.....

First off I tape my pattern to the window.  I tend to use washi tape because it is low tack and can be easily removed.


On top of this, I then tape my fabric, be generous with the tape as you do not want your fabric to move about.


Then I simply trace over the top.  I generally use either a self erasing pen, a water erasable pen or a Frixion marker....whatever pen you decide to use, always remember to do a little test patch first on your fabric!


A little note on transferring the design,  for details like the writing, I transfer it exactly as shown on the pattern, however for flowers that I intend on stitching with Lazy Daisies and French Knots, (like the ones shown below), I transfer the inner circle as shown, which gives me an outline to work around and infill with the French Knots and for the petals, I simply mark the outer tips of the petals with little dots, which I use to position my Lazy Daisy stitches.


For the little Lasy Daisy flowers, I simply mark there positions on the embroidery with a dot at their centre, as shown below.......


 I hope that all makes sense, but if you have any questions, as always, please do ask away and I'll do my very best to help.

I'll leave you with the view, it's amazing how in just a month it has changed from brown earth to a field of green, isn't mother nature clever!


Share:

16 October 2013

Filled Heart take 2


Oh what fun I had making this mini quilt for my daughter.  I got to play with felt, buttons and choose lots of pretty fabrics.  The central design as you can see is my new filled heart embroidery, but as an alternative, I substituted some of the embroidered flowers for felt and button versions...and wow, I'm thrilled with how it turned out, so much so I've included templates with the pattern so that you can make the appliqued version if you prefer.

I love the pretty pastel shades of the felt, the mix of ditsy Sevenberry florals and dots and stripes by Tilda...I'm already planning what I can make with them next!!  I had a lovely few hours hand quilting using Pearl 8 threads and for the binding I used Stof Candy Pink gingham, which I cut on the cross, this is really effective don't  you think.

If you would like to make something similar, the centre linen panel is 8"square and is surrounded by a border of twenty four 2" squares, which in turn was framed with white panels measuring 2" wide and then finally I added the binding. 

Right I must dash, a certain young ladies bedroom is in need of a tidy, because believe me, there was lots of creative photographing and editing to crop out the mess that is her floor....I may be some time!!
Share:

10 October 2013

Finished at last!


I am so thrilled, today I finished my filled heart embroidery...high five!!  Now normally I wouldn't share until I had the pattern ready to go, but to be honest, I am so excited I just couldn't wait.......  


The colours as ever are bright and cheery and I used Pearl 8 cotton threads, stitched on vintage french linen. 


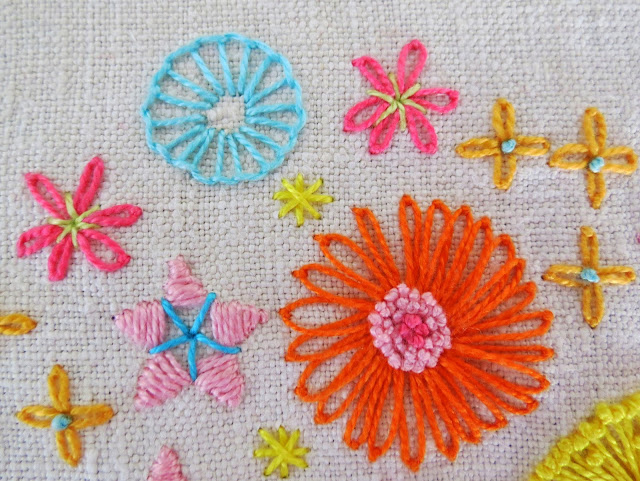
I used my favourite French Knots and Lazy Daises to form the large orange flowers, Straight Stitches for the little yellow stars and a combination of Satin Stitch and Straight Stitches for the pink and blue flowers.


The fuchsia and green flowers are a combination of Lazy Daisies and little Straight Stitches, so simple yet so effective, don't you think.  The aqua flower is Buttonhole Stitch, which is basically a little circle of Blanket Stitches formed close together on inner circle. I'm thinking now this would also look nice with the centre in filled with French Knots...hummm watch this space!


The green and orange flower was an experiment and I am really happy with how it has turned out.  I used lots and lots and lots of Straight Stitches very close together and then a really full cluster of French Knots in the centre.


My favourite flower however,  is the bright yellow one.  For this I first of stitched a circle of French Knots around the parameter and then in filled with long Straight Stitches and finally added some shorter Straight Stitches with French Knots at their tips.  It's form reminded me of the gorgeous Alliums in my front garden.


I'm going to add a border of pretty florals and turn it into a cushion to sit on our bed.  Poppy has also requested one for her bedroom stitched in Spring pastel shades, now that would look pretty!  I'm also thinking just how lovely an alphabet would look infilled with flowers...what do you think?

Right must dash, but I'll be back to let you know as soon as the pattern is available, I'll also (fingers crossed) have some exciting news to share regarding embroidery supplies.
Share:
© A Little Happy Place | All rights reserved.
Blog Layout Created by pipdig